Three approaches to extract more data with your confocal microscope
Rebecca Bonfig and Matthew Weitzman (both Olympus Life Science, MA, USA) explore the ways researchers can make the most out of their treasured neural and brain tissue samples using three different confocal microscopy techniques.
In biology, and especially in neuroscience, samples are precious. They can be hard to come by and take a significant amount of time and resources to prepare, and even more time and resources to analyze. Neuroscientists must therefore use their samples wisely to get as much data from them as possible, particularly when it comes to designing imaging experiments. A popular tool for neuroscientists, the confocal microscope has long been a staple instrument for acquiring three-dimensional images. While conventional imaging experiments have been limited to three- or four-color imaging, modern confocal microscopes are pushing the envelope even further to maximize data collection. Presented here are three readily available approaches to extracting more information from brain and neural tissue samples.
Spectral Imaging
One of the perhaps easiest and yet commonly overlooked approaches to gleaning more information from your sample is the use of spectral or “lambda” scans to create a spectral profile of the various signals present in a tissue sample. Similar to a Z-stack capturing an image by stepping through Z positions one at a time, lambda scans work by stepping through the emission spectrum in discreet, predefined steps. Just as users can define how small or large of a Z step to take, users can define the size of the detection bandwidth and the step sizes in a lambda scan, in accordance with the labels present. For example, a sample with spectrally distinct fluorophores can get away with larger bandwidths and step sizes, whereas a sample with highly overlapping fluorophore emission spectra will benefit from smaller bandwidths and step sizes.
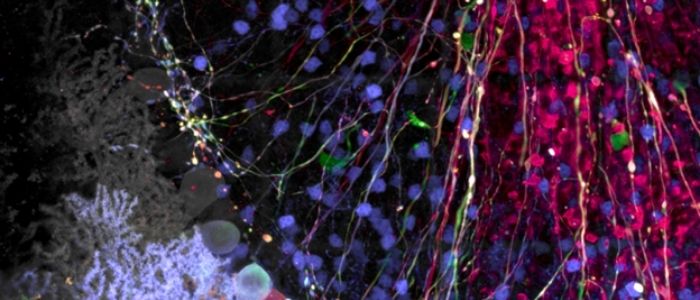
Spectral imaging is a highly useful technique not only to separate closely overlapping fluorophores, but also to remove autofluorescence, which can be a particular nuisance in brain or neural tissues because of the lipid bilayers and high levels of lipofuscin. Lambda scanning is also particularly useful for imaging Brainbow- or Confetti-labeled tissues, as those stochastic multilabeling techniques result in a wide range of possible color combinations beyond the traditional three-color staining typically performed. Spectral imaging of Brainbow-type samples enables users to fully unmix any overlapping emission spectra such that individual cell populations can be accurately identified (Figure 1).
Figure 1: Brainbow AAV transfection of Purkinje cells, amplified with antibodies as described in Cai et al. 2013. Visible are Purkinje cell somata, dendrites, and axons, as well as some aspecific staining of granule cells. Image taken on the FV3000 microscope with a 100X silicone oil objective.
Reflectance Confocal Microscopy
Another way to extract more useful information from tissue samples is using a technique called reflectance confocal microscopy. Although confocal microscopes are designed for fluorescence observation, with a little ingenuity, it can also perform reflectance confocal imaging for some cases. The reflectance confocal imaging technique is often overlooked despite its versatility and practicality, as it can be used to extract endogenous information from biological tissues without the need for additional labeling.
One use for a reflectance light path is capturing endogenous signals for added contrast and awareness of the sample environment. The basic premise of the technique relies on the fact that the interface between biological fibrillar protein structures and water produces a strong reflective contrast signal. This contrast signal can be captured by simply descanning the excitation light to a detector that is set to an overlapping bandwidth, enabling users to identify specific cellular structures, the organization state of the extracellular matrix environment, or material surface features. When combined with fluorescence observations, this added multispectral reflectance capability can extract the location of unlabeled cellular structures.
An example of this technique is shown in Figure 2, wherein a fixed rat-brain section has been immunolabeled with three different fluorophores. A standard three-channel acquisition reveals excellent epitope-specific labeling of neuronal dendrites (orange), catecholaminergic neurons (magenta) that contain dopamine or norepinephrine, and nuclei (cyan).
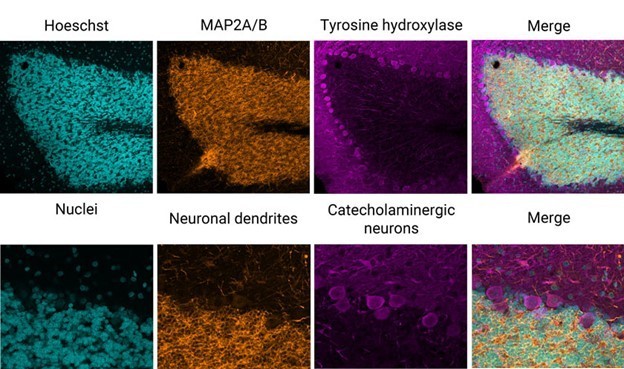
Figure 2: Three-color immunofluorescence-labeled rat-brain section stained with antibodies from EnCor Biotechnology Inc. Top panels: whole field single Z-plane image acquired with an X Line 20X objective on the Olympus FV3000 microscope. Bottom panels: true pixel resolution of a highlighted inset square.
While the three-color labeling provides a good amount of data by itself, reflectance confocal microscopy can add yet another layer of useful information. By using four channels simultaneously to image the reflectance of laser lines 405, 488, 561, and 640 nm, a multispectral map of the myelinated neurons within this tissue can easily be generated (Figure 3).
This label-free information can be used to judge the degree of myelination occurring on the neurons of interest, which were selectively labeled by immunofluorescence, or to help with applications that require axon tracing.
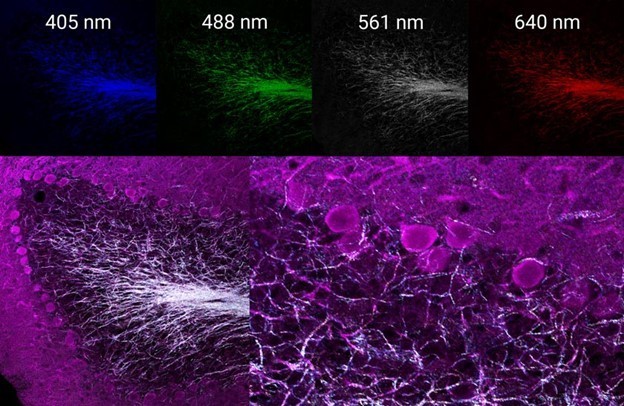
Figure 3 (top): Individual reflectance confocal images of each line acquired simultaneously. Bottom: merged images of immunofluorescence-labeled dopamine-containing neurons (magenta) and the multispectral reflectance confocal image of endogenous axon myelination (white).
Near-infrared (NIR) for Multiplexing
One of the reasons the confocal microscope is such a workhorse of modern microscopy is due to its inherent ability to image multiple fluorophores with good separation, as well as image deep within a biological specimen with high axial resolution. These properties of the confocal microscope can be further enhanced by adding NIR excitation lasers to the suite of imaging lasers. Benefits of imaging with a NIR laser include greater multiplexing capabilities, decreased autofluorescence, gentler live-cell imaging, and deeper imaging with less absorption and scattering. In brain and neural tissue, where these matters present common limitations in imaging experiments, NIR imaging presents an easy solution for overcoming traditional hurdles.
 Thinking beyond fluorescence: biological imaging with SHG and THG microscopy
In modern life science research, fluorescence microscopy is a popular and powerful imaging technique. Yet, despite its overall success, the need for fluorescent labels limit its potential applications. How can we image beyond fluorescence microscopy?
Take, for example, the need to study multiple target proteins and structures in a single experiment. Traditional confocal microscopes have only offered laser lines out to ~640 nm, with detection limited to 750 or 800 nm, which has limited users from increasing the number of fluorophores they can label a tissue section with while still maintaining good separation between the emission spectra. With the latest laser diode technology, some confocal microscopes can now incorporate laser lines out to 730 nm or 785 nm. When combined with red-shifted detectors, the detection range can be extended out another 100 nm, which provides significantly more room to fit more fluorophores into a multiplexing experiment (Figure 4).
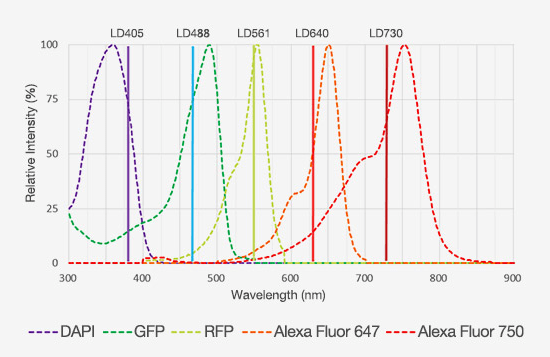
Figure 4: Emission spectra of five fluorophores that display minimal spectral overlap, enabling them to be used in a multiplexing experiment.
Another major hurdle often faced when imaging neural tissue is the presence of autofluorescence. Since most of the autofluorescence signal from neural tissue is in the green spectrum, an easy way to avoid autofluorescence during imaging is to shift away from the lower end of the spectrum and incorporate more red-shifted dyes into the sample. There are now several commercially available NIR fluorescent dyes suitable for this purpose, such as Cy7, Alexa Fluor 750, Alexa Fluor 790, and Cy7.5.
For live-cell experiments such as with primary neurons, NIR light sources offer a gentler solution for extended time-lapse imaging applications versus higher-energy visible lasers, which can easily damage cells by creating reactive oxygen species. Lastly, NIR light can be used to image deeper into brain tissue, since it takes advantage of an optical window where there is less absorbance by compounds within the tissue (including melanin, heme, flavoproteins, and water). As shown in Figure 5, when imaging through fixed brain tissue, the 405 and 488 nm lasers are limited to a penetration depth of 100–200µm, while the 785 nm laser easily achieves up to 400 µm with a high signal-to-noise ratio.
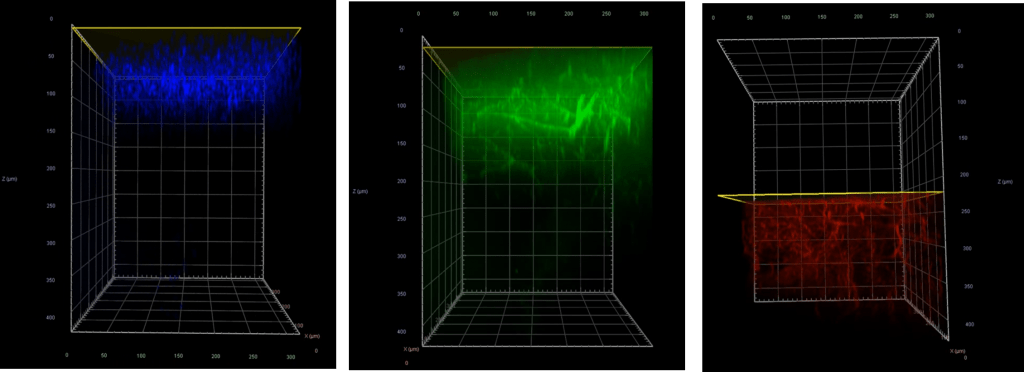
Figure 5: Fixed mouse brain showing the penetration depths of the 405 nm laser (blue), 488 nm laser (green), and 785 nm laser (red).
The three approaches outlined here can hopefully provide some inspiration for your next imaging experiment and encourage you to start asking more of your confocal microscope!